A month with the Canon RF 100-500mm
The Canon 100-400mm IS2 has been my go-to piece of glass for the past few years. I love the versatility of the lens and time and again I have written and advocated the use of this lens for various field scenarios in wildlife photography. When Canon launched the twin brother of this lens in the form of a Canon RF 100-500mm for the mirrorless state-of-the-art wildlife cameras like the Canon EOS R6 and Canon EOS R5, I was quite intrigued as to what difference it can bring to my area of work. I was given the opportunity to try out this lens for a month and with my ongoing projects I could put it to field usage in two different situations.
The first step was to use the Canon RF 100-500mm mounted on the Canon EOS R5 in a typical Indian wildlife safari where one is confined to a vehicle. Jhalana Leopard Sanctuary in Jaipur was my area of work where I focused on big cats and mammals. Stage 2 of the field test was the outskirts of Corbett Tiger Reserve where I spent 3 weeks on foot searching for Himalayan wildlife and birds.
Some of my observations from this experiences are listed below:
- I am a 400mm 2.8 user and for maximising my output from the Canon RF 100-500mm I took a conscious decision not to carry the big prime for both these field trips. Did I ever miss or regret that decision? No! I didn’t as the Canon RF 100-500mm was versatile enough specially with the Canon EOS R5 which has an in-camera cropping feature that enables you to produce cropped RAW files. So essentially I was able to toggle between 500mm and 800mm using the in-camera crop feature just at the click of a button.
- Birding with the light weight Canon RF 100-500mm in a rough Himalayan terrain was great fun. The ease of use and the ability to hike around with a light weight equipment set up that enables you to scale up to 800mm was a really cool feature.
- On many occasions in both the field locations, the light conditions were tricky and I had to bump up the ISO in order to get the desired shutter speed. The Canon RF 100-500mm handled low light extremely well whenever the light threw a challenge.
- Canon had also given me the RF teleconverters and I did use the Canon RF 100-500mm with the 2x and 1.4x RF teleconverters. Something which I have never done with the Canon EF 100-400mm IS2. The experiment was a success as whenever the subject was is good light, the convertors did give the desired results.
As a concluding statement here is my take on the Canon RF 100-500mm. All you photographers migrating to the mirrorless technology who are still thinking of a good zoom telephoto for wildlife photography this is the lens to go in for. It will give you the range, flexibility and you should confidently use it across various genres of nature photography like I did in the past month. From birds, mammals and landscapes – it just keeps performing!
Sample images below:


Canon R6 Field Testing
In the first week of July I tested out the sample units of the highly awaited and newly announced Canon mirrorless system. The sample units given to me comprised the Canon R6, Canon RF 800mm f11, Canon RF 600mm f11 and the Canon RF 15-35 f2.8
My field testing location was the outskirts of Corbett National Park and an area around Delhi where I had been working with langur monkeys through the lockdown period. While I was quite kicked about using a mirrorless camera but my expectations with the two f11 prime lenses was quite low when I started working in the field.
The lenses were feather-weight and as I started a gruelling monsoon trek in the humid forest I was wondering that in a normal scenario I would have never carried by big primes and here I had a mini toy of a 800mm which is so simple to carry but would it perform to the best of its abilities being fixed at f11? That was the question which needed answers.
As hours and days passed by my confidence in these lenses started growing. Why? Apart from the weight factor the lenses were fast in catching on to focus. Remember this is the monsoon period in India and I didn’t expect to see large mammals. So my test subjects were mostly small Himalayan birds and the miniature world. I was amazed with the performance of these lenses as I worked with small subjects like caterpillars, spiders etc. The sharpness was totally acceptable and over the days I enjoyed tossing a 800mm while trekking up and down the saal forests.
Talking about the Canon R6 the camera is no doubt a technological marvel from Canon. Light weight, brilliant low light performance and the animal eye tracking worked throughout whether it was the tiny macro subjects in Corbett or the ever-agile langurs and their cute little babies.
So for all you photographers who have been wanting to scale up your focal lengths for your bird photography or even for specialised expeditions like snow leopards where this range is needed, feel free to go in for these lenses along with the Canon R6 combination. It is worth considering.
Here are some sample images and a couple of video reviews that summarise the field visit.


Canon R6 and Canon RF 800mm f11 and the 2x RF converter

Canon R6 and Canon RF 800mm f11 and the 2x RF converter

Canon R6 and Canon RF 800mm f11 and the 2x RF converter
On the Panel – Episodes 1 to 3
The COVID19 lockdown has locked everyone and the present and the future looks uncertain as of now. However the positive side in the creative world is that the photographic community has come forward and has been very open in sharing knowledge in innovative ways. We started a discussion series bringing together the best of natural history photographers from across the globe to discuss various aspects of wildlife photography and for me it has a great experience interacting with all my international colleagues and recording some of these interactions.
Check out the first 3 episodes of On the Panel hosted by writer, film maker and journalist – Shatabdi Chakrabarti as she grills us on DSLR camera trapping, photographing wildlife after dark, creativity in wildlife photography, evolution of wildlife photography in India and much more.
There are many more exciting episodes coming up. So subscribe to the Nature Wanderers channel on YouTube and or follow my Instagram page.
On the Panel – Episode 1 : Evolution of Wildlife Photography in India
Panelists : Shivang Mehta, Rahul Sachdev & Prakash Ramakrishnan
On the Panel – Episode 2 : DSLR Camera Trapping
Panelists : Ben Cranke (Award Winning Photographer from South Africa) & Shivang Mehta
On the Panel – Episode 3 : Night Wildlife Photography & Usage of Flash
Panelists : BBC Wildlife Photographer of the Year – Wim van den Heever, Nature’s Best Africa Wildlife Photographer of the Year – Brendon Cremer and Canon EOS Ambassador and Siena International Photographer Award (Wildlife) Winner – Shivang Mehta.
Canon 90D – Does it fit in your wildlife kit?

- 45 cross type focus points – The moment I looked through the view finder of the Canon 90D the huge gamut of 45 cross type focus points which occupied a substantial area of the view finder caught my immediate attention. Composition and focusing becomes fun with this wide spread of focus points and I had a great time composing my subjects in various parts of the frame
- 32.5 megapixels – I am not a fan of cropping images and strongly believe in in-camera compositions. A camera packed with megapixels means that you get better details and that was the pick of the features for me. Even if you have to crop up 15-20% of the image you have enough data in the image to make a completely useable image.
- ISO performance – All cameras perform well in good light conditions. The challenge is when the light is tricky. In Manas I got the opportunity to test out this camera in two different light situations. A backlit capped langur and the results were satisfactory. I then encountered a herd of elephants and in hazy conditions I photographed this herd at various ISOs ranging from ISO 800 to ISO 1600. The noise at ISO 1250 and ISO 1600 was perfectly manageable.
- The Flip Screen – While shooting from a vehicle I usually struggle to take a low angle shot. A lot of times I am seen hanging out from the window at times with the camera attached to a monopod and a remote trigger to take wide perspectives of subjects close to the vehicle. I do get the results but its purely a hit and trial technique and the composition does go for a toss. With a flip screen life becomes easier as you do get to see the composition and frame when your eye is off the view finder and this feature was very handy.
- Focusing & Speed – I refer back to the capped langur troop that was moving in thickets with the sun hitting their backs. The limited openings in the tree meant that the camera needed to be fast in catching the focus and the burst firing at 10 fps was adequate enough for catching the fine moments on the tree.


Tackling “Tiger Boredom”


Shooting Portraits


The Dissection Technique for Portraits


The Cement Issue


Tiger in cemented waterhole – Bandhavgarh
Reflections


Canon 1DxM2 – Field Test

Pench National Park
Canon 1DxM2, Canon 70-200mm f2.8 IS2

Dudhwa National Park
Canon 1DxM2, Canon 400mm f2.8 IS2
The much awaited successor of the Canon 1Dx – the top end Canon camera for sports and wildlife photography – was announced and launched by Canon recently. Thanks to Canon India for giving me the opportunity to use the first sample unit of this new machine in the challenging field conditions of Indian forests. Having used the 1D predecessors like the Canon 1DM4 and Canon 1Dx extensively in the last 5 years, I was particularly intrigued to know more about the Canon 1DxM2 because for me Canon 1Dx was the complete camera and I wasn’t expecting an upgrade so soon.

Using a Fine Detail (FD) picture style introduced in the Canon 1DxM2 for shooting portraits
Drawing a direct comparison between the Canon 1Dx and Canon 1DxM2, here are some broad level observations (please note that I tested the camera for still photography. The Canon 1DxM2 records 4K videos which is not covered in my field tests):
Muted Shutter Sounds
In comparison to the predecessors like the 1DM4 and the 1Dx the first thing you realise about the 1DxM2 is the relatively muted tone of the shutter. As per the tech specs an advanced mirror flapping system has been introduced which will probable and possibly reduce in-camera vibrations while firing bursts of 12-14 fps. Typically on a Canon 1Dx I tone done my fps to reduce in camera vibrations while firing a burst so that the probabilities of some images turning out to be tad soft goes down while shooting some fast action. I shot some fast Dhol action sequences in Pench National Park at 14fps in challenging low lights early morning and was pretty satisfied with the series in terms of image sharpness.

ISO 200, f6.3, 1/1000. Fired a burst at 14fps. All images in the series have the required detail

ISO 3200, f5.6, 1/500
Shot using a Canon 400mm f2.8 IS2 lens. A burst at 14 fps was fired for this series
Expanded Viewfinder Grid
The 61 point AF grid through the Canon 1DxM2 viewfinder looks a bit more expanded as compared to the Canon 1Dx. It essentially means that your in-camera composition is better.

Aided with the expanded AF point grid, here is an in-camera composition of cheetals grazing in morning light at Pench National Park
Low light performance
I pushed the Canon 1DxM2 ISO to a maximum of 3200 during some misty conditions at Dudhwa National Park and the noise was workable and can easily be removed using noise reduction tools.

ISO 3200, Extreme Low Light.
View Finder Guiders
A feature which was introduced in the Canon 7DM2 has been pushed in the new Canon 1DxM2 as well. If you look through the view finder of this body, you can see some of your basic camera settings like White Balance, Metering Modes, AF Drive, Shooting Modes and a horizon stabilisation bar. The font colour is however black and the display works very well only when you are shooting with bright backgrounds.

A screenshot of the icons you can see through the view finder of the Canon 1DxM2
Advanced AF for f8 lenses
Typically while using a Canon 1Dx with Canon 500mm or 600mm f4 lens and a 2x converter, only the centre focus points used to be active. A noted beneficial feature with the Canon 1DxM2 is that all 61 focus points remain active with f8 lenses (if you are using the new generation 1.4x and 2x converters). 41 of those points are cross-type, having both horizontal and vertical line sensitivity. 5 central points are dual cross-type and have wider baselines that offer high precision focusing for F2.8 and faster lenses.
Touch Screen
While shooting using the Live View feature you can now touch the LCD of the Canon 1DxM2 to focus your subject. The feature is good for shooting videos as well.

I mounted the camera on a beanbag and used the Live View AF touch screen feature to focus on the subject at the corner of the frame. Using Canon 1DxM2 and Canon 400mm f2.8 IS2
Feel free to share your thoughts in the comments section…
Maximize your field productivity
Every day as I accompany photographers on the field, the sight of a tiger makes cameras go ballistic as triggers are pressed with sheer madness. Sitting in the hotel room when I see the days work of people the hard disks are full of similar looking images and then the ‘I wish’ list begins… I wish I had shot like this… I wish I had done this better…
I always wonder that when you as a photographer pick your camera to shoot say a spotted deer a lot of thought goes behind that image. You take the pain to place the deer properly in the frame, you experiment with compositions. Why does that happen? It is just because you consider the deer as a subject. Yes subjects like tigers are rare to find but the moment you get a control on your mind and start treating them as subjects you will end up maximizing your field productivity and make best use of the opportunities that nature presents in front of you.
Have you ever tried pondering on the following points?
- Removing your eye from the view finder to see the subject with your naked eyes and scan for elements which can be added or removed from the frame?
- You may be using the biggest prime lens in the world that will give you a razor sharp image. However are those sharp images needed every time? How about experimenting with varied focal lengths to create 4-5 different images of a moment as simple as a tiger sitting under a tree.
- Reading the light and pre-visualizing images for a certain light situation. You may end up forgoing some images but you will be better prepared for that particular lighting scenario
I got hold of the new and revamped Canon 100-400mm IS2 and rested my Canon 70-200mm f2.8 IS2. I used it extensively in Ranthambhore throughout last week. Here is an example from Ranthambhore where a tiger sitting under a tree was shot in 5 different ways as varied focal lengths.
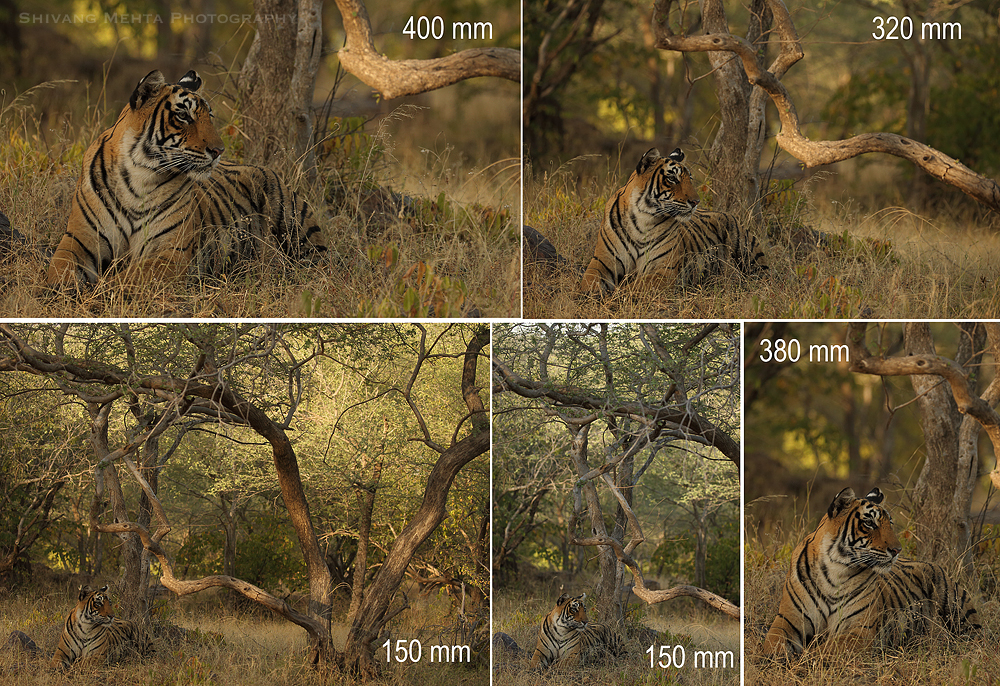
Krishna (T19) female cub shot using Canon 1Dx and Canon 100-400mm IS2
Planning for a Kenya Travel : Kunzum TV
It is monsoons and I am just doing some serious desk job before hitting the field again in August. Recently I recorded a 3 episode series for my close friend, journalist and India’s #1 travel blogger Ajay Jain for his initiative Kunzum TV.
So have you missed your bus to Masai Mara and other locations in Kenya this year? Is Kenya a destination for you in the future and you are still getting confused on what to choose amidst the crowd of packages being offered by different operators in the market? Watch the 3 part episode series on Kunzum TV to get an answer to all your WHYs pertaining to Kenyan locations like Masai Mara and plan your holiday to the Mecca of Wildlife.
Nature Photography : Answering your Whys

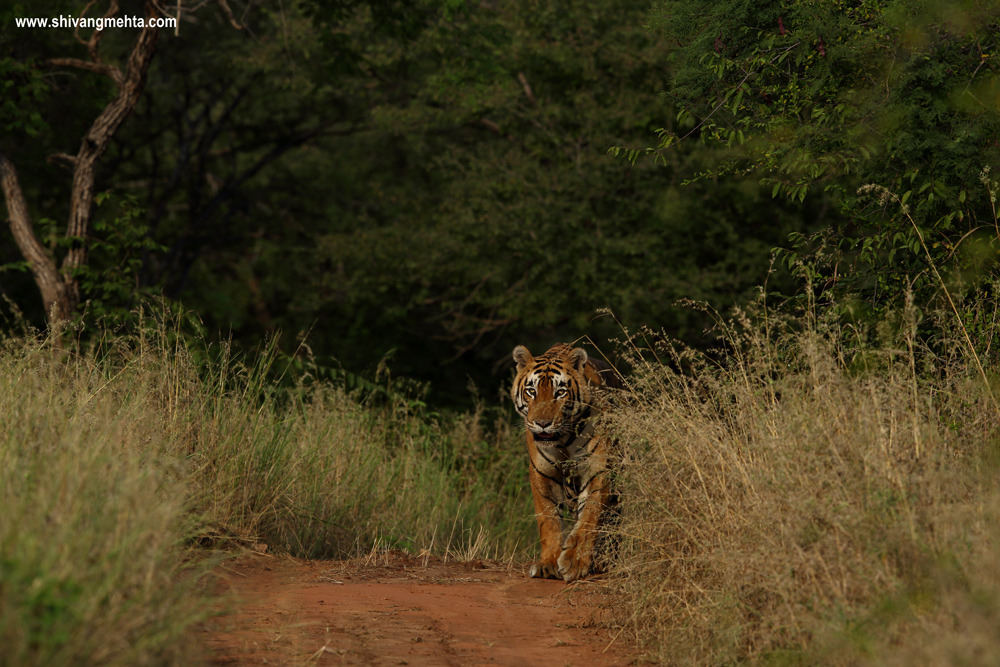
T19 (Krishna) walking through a forest thicket in Ranthambhore
A lot of ‘whys’ are put forward during my workshops and photo tours. Why did I use this lens to shoot a particular image? Why did I expose this image in this way? Why did I use a particular combination of ISO, shutter, aperture etc? My standard response is it all depends on what you as a photographer have envisioned for a particular image and what you want to create…
For this particular image here are a few responses to some of the Whys:
- Why did I go for a tight composition?
- Because the habitat in which the tiger was walking for full of clutter which wasn’t appealing for a wide shot. I had a choice of a Canon 400mm f2.8 IS2 and a Canon 70-200mm handy with me this time. My decision to go tight was mainly to deal with the clutter of a dense Dhonk vegetation which is omnipresent in a place like Ranthambhore.
- Why did I underexpose the image?
- Just to capitalize on the patches of cut light falling on the face while the subject was in motion. I did not shoot a lot of images when the subject was walking in the shade areas and was just preparing myself to shoot for the light patches. Even before the tiger started walking the light patches in the Dhonk forest something which I found interesting to play with. As soon as the subject started moving towards those light patches, I metered for those patches only. I did miss some moments when the subject was walking in shade areas but that was not the image I had created in my mind.
- Why did I compose vertically?
- Because it was too close and a horizontal composition may have resulted in some part of the leg being cut from the frame which would have looked odd. I knew there was little margin for error in the composition but it was worth the risk because it was this sort of an image which I had visualized in my head…Nature photography is all about visualization and knowing what you want out of something happening in front of you. The quicker you think the more comfortable you would be in answering you Whys…–
Equipment Used : Canon 1Dx, Canon 400mm f2.8 IS2, ISO 200, f4, 1/2000. Mounted on a NW BLite Bean Bag
Canon EOS 7D Mark II : A Field Review
It is Christmas today and in case you shutterbugs want to present yourself with the aspiration and much talked about Canon 7D Mark 2, here is a brief field report of my experience with this latest APSC launch by Canon. I had the privilege to rough out a demo Canon 7D Mark2 provided by Canon India over a period of 15 days in Ranthambhore and Kanha in varied light conditions and shooting scenarios. This review is by no means a detailed technical review which has already been done by a host of online forums and portals. It should purely be considered as a field review of my experience using this body and since I deal with varied photographers on a daily basis, I would also attempt to suggest the need of a Canon 7D Mark2 for different strata of lensmen.
5 years back the Canon 7D had taken the market by storm. A robust, well built magnesium alloy body with 19 AF points, the Canon 7D which shot at 8fps was built for wildlife and sports photography. Priced at around USD 1699 in September 2009, Canon literally captured the amateur market as the Canon 7D had become an obvious choice of enthusiasts wishing to pick up their maiden camera for wildlife. Along with the Canon 100-400mm and the Canon 300mm f4, the amateurs and serious amateurs swore by this combination for years. At times I was amazed to see the rapid uptake of this combination during my safaris in various parts of India and I certainly believe that this affordable combo played an instrumental role in the uptake of wildlife and nature photography in India in the last 5 years. The Canon 7D also acted as a great back up body for the Canon 1D Mark4 and Canon 5D Mark2 users of those times.
However the Canon 7D had its own pain points in the form of low light performance, loss of details, color rendering etc. It was also said that Canon has essentially given this camera the look and feel of a pro body but the performance is way below standard and the ISO performance of the Canon 7D was always a subject of debate. Some photographers believed that being a cropped sensor Canon could have reduced the megapixels of the Canon 7D to around 12mp which would have improved the noise performance in low light situations. Over the time, Canon 7D – despite of its limitations – had become like an essential element of your camera kit.
A lot of hopes were pegged on the Canon 7D Mark2 which is expecting to wipe off the Canon 7D woes and having used the 7D extensively during the 2009-2011 period, I was also eager to unfold the 7D Mark2 mystery as I grabbed hold of this light weight body in early December in 2 of India’s leading tiger reserves – Kanha and Ranthambhore.
My first impressions of the Canon 7D Mark2 were positive.
- A 65 all cross type focusing grid through the view finder opens a world of compositional and framing opportunities for you. Specially helpful while showcasing the habitat and the environment of your subject
- Toggling between focusing modes on high end machines like the Canon 5D MarkIII and Canon 1Dx is a task. It is normally a 2-3 step process. The smart nob provided next to the thumb joystick of the Canon 7DM2 was a delight to use. It definitely helps a lot if you want to go from spot focusing to the various zone focusing (expand 4, 9 points) while looking through the view finder
- The view finder console also enables you to see all your camera settings – WB, metering modes and a smart alignment scale on the top to ensure that your horizons are always in line.

Dissection of the Canon EOS 7D Mark II view finder

65 cross type AF grid through the view finder of the Canon EOS 7D Mark II
Winter wildlife photography in India is definitely a joy for photographers. The early morning mist mingles with the morning light to give some dramatic colors which make even the most common subjects look photogenic. However a lot depends on the camera you are using as the winter light in the morning is very soft and requires a camera with good low light performance. The Canon 7D Mark 2 was put to test to shoot barasinghas (swamp deer) in the open meadows of Kanha on day 1 and the results were at par with the Canon 5D Mark III which was used to shoot the same subject. However the light wasn’t very soft at this point of time and most of the images were shot at ISO 400-500. Here are some of the results.

Canon EOS 7D Mark II , Canon 400mm f2.8 IS2 (ISO 400, f6.3, 1/500)

Canon EOS 7D Mark II, Canon 400mm f2.8 IS2 (ISO 400, f7.1, 1/640)
The following evening, light in Kanha was superb. A jackal emerged from the dense saal canopies of Kanha towards an open patch of grasslands and the Canon 7D Mark2 was tested in routine good light conditions and the details and color rendering was spot on. I felt there wasn’t any comparison that could be drawn with the Canon 7D as till now the Canon 7D Mark 2 was performing at par with my high end bodies like the Canon 5D Mark3, Canon 1D Mark 4 and Canon 1Dx. Infact I was enjoying using the focus points toggling button and the view finder console more than the three top of the league machines lying in my bag. Here are the results:

Canon EOS 7D Mark II, Canon 400mm f2.8 IS2 (ISO 100, f5.6, 1/500)

Close up of the image above. Canon EOS 7D MarkII details were spot on.
I am not in favor of excessive cropping of images as according to me framing and compositions need to be in-camera as much as possible, but in this era of digital photography when cameras are a part of this megapixel race, cropped composition is a trend followed by a lot of photographers. Packed with 20 MP, the Canon 7D Mark 2 retains sufficient image details when cropped by as much as 60 percent. Here is a cropped version of a spider’s web from Kanha National Park.

Cropped Composition – approx 50% cropped

Giant wood spider web in Kanha – full frame on a Canon EOS 7D Mark II
Canon 7DM2 – ISO performance
The above mentioned facts were some obvious improvements which were expected from a Canon 7D upgrade. The big question however still remained in my head : how will the Canon 7DM2 fare in a tricky light condition? Can it be trusted like the big brothers – 5DM3 and 1Dx when it comes to ISO performance?
As I was traversing through the saal tracks of Kanha National Park with this question pondering in my head, the opportunity I had been waiting for came on a platter. A full grown male Bengal Tiger was caught taking a nap in the middle of the road. The light conditions were poor and it was time for an acid test for the Canon 7D Mark2. Being attuned to a 1Dx and 5DM3, I started shooting at 3200 ISO straight away and the results were definitely not at par with the top of the line Canon bodies. I then slowly experimented with varied ISOs ranging from 800 to 1600. My lens was a combination of a Canon 400mm f2.8 IS2 and a Canon 70-200mm f2.8 IS2. In all circumstances I was a bit skeptical going above 1600 ISO which according to me was the maximum threshold in the given light condition. The results were remarkable at 1000-1600 ISO specially among the entire gamut of cropped sensors available in the market till date.
Given below are some of the results:

Canon EOS 7D Mark II and Canon 400mm f2.8 IS2
(ISO 1000, 1/320, f 3.5)

50% crop of the same image (unedited RAW)
Drawing parallels for the Canon 7D Mark2 with heavyweights full frame sensors like the Canon 5D Mark3 and Canon 1Dx would be an unfair comparison as the latter do have a superior low light performance and definitely have an edge when used at ISO 2000-3200. However amongst the cropped sensors including its predecessor, the Canon 7D Mark2 does work brilliantly between ISO 1000-1600. I do recall that years back when I was on a Canon 7D, the brain was tuned not to boost the ISO above 800 (640 at times).
Using the in-camera live view feature
In the middle of this testing phase for the Canon 7D Mark2, I shifted my workstation from Kanha to Ranthambhore and while I was still looking for a good opportunity to test the 10fps of this body, my first day in Ranthambhore gave me an opportunity to try something very interesting with the 7DM2 : The Live-view feature.
Using the live view for still photography is not something we regularly do since we are more comfortable shooting from the optical viewfinder. However, a DSLR live view feature is definitely useful when the subject is still and not in motion and you have the luxury of time to compose and frame in a manner that the subject lies beyond the reach of the focus points of your DSLR. Even in high end full frame bodies like the 5DM3 and 1Dx, using the live view can become a bit frustrating at times. You need to press the AF repeatedly to fine tune the focus and at times you need to focus manually as well after magnifying your subject to 100% to ensure the focus is precise. The Canon 7D Mark2 live view feature is an absolute delight as the camera is built to focus automatically. Even when the subject occupies a small part of the frame, you can just magnify by 50% or 100% and the camera will automatically focus on the subject. Ofcourse, this works brilliantly when you are shooting videos and unlike most of the DSLRs including the big Canon machines, the 7DM2 hooks on to the focus automatically.
Here is a tiger image shot on the Canon 7DM2 using this live view feature:

Canon EOS 7D Mark II on a Canon 70-200mm f2.8 IS2 (ISO 1000, f5.6, 1/320). Shot using camera live-view (bean bag support)

50% cropped view. The focus on the tiger was spot-on. Time taken to focus on the tiger using the live-view was just a few milliseconds.
The Canon 7DM2 – 10fps test
At 10fps, the Canon 7DM2 was slated to be a mini Canon 1DM4 (the 1Dx predecessor shot brilliantly at 10fps). I encountered a fast jackal fight sequence during my Ranthambhore field days. The situation was tricky because of the presence of foreground grass which I purposely did not want to avoid in order to check the AF of the 7DM2 specially on a burst mode. The subjects were back lit as well. It was an awesome experience shooting this action sequence with the 7DM2 and 400mm f2.8 combo. Of the 5-6 frames that I got, none of the images had soft focus. It was more like using a 1Dx which can be relied on blindly in case of fast action and precision when it comes to focusing.

Darter take off. Canon EOS 7D Mark II, Canon 400mm f2.8 IS2 (ISO 200, f5.6, 1/1000)
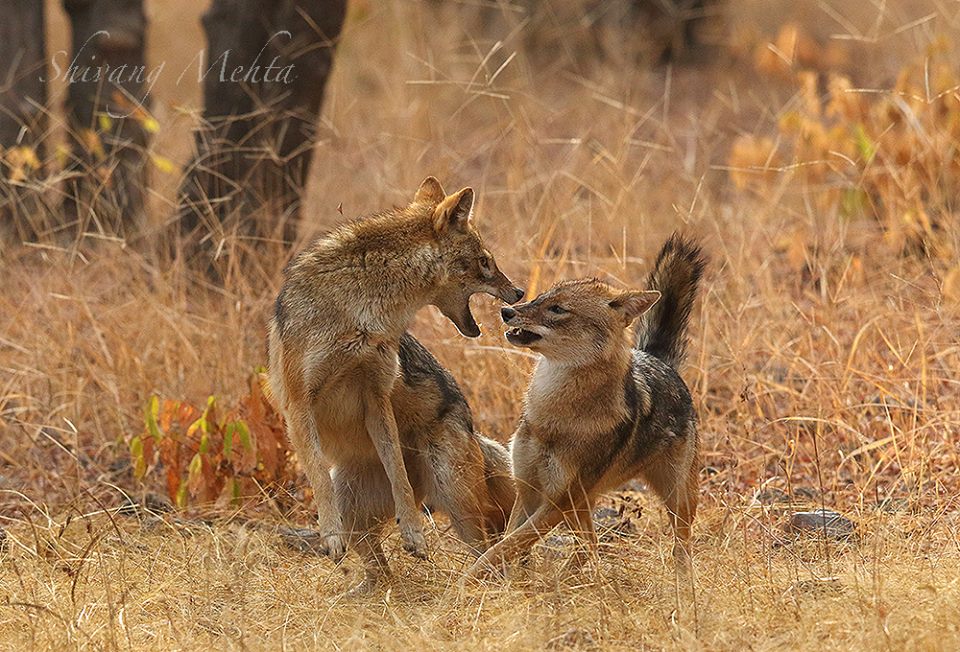
Jackal fight – Ranthambhore National Park. Canon EOS 7D Mark II and Canon 400mm f2.8 IS2. ISO800, 1/1250. f6.3
So what’s my verdict on the Canon 7DM2?
I am not a tech or camera guru to give any verdict. I am just an artist who tries to create images from whatever equipments are around me. However here are my suggestions on the basis of which you can base your Canon 7D Mark2 purchase decision:
- A fast DSLR which can perform well in low light is a basic pre-requisite for wildlife photography. In case you are planning to learn wildlife photography and want to pick up your maiden DSLR, the Canon 7D Mark2 is a must for your kit. It has some built in features of high end Canon cameras like the 5DM3 and 1Dx and given the price point Canon is marketing this product at, it would definitely aid your photographic visions.
- For serious amateurs and pros who already have a range of Canon DSLRs in their kit, having the Canon 7DM2 in your kit is a good option. A lot of times we need range in order to create the exact frame we have visualized and instead of putting on a teleconverter which would impact your aperture as well, you can just swap bodies and use the 1.6x cropped sensor of the Canon 7DM2. In good light situations, you wouldn’t miss your top of the league bodies for sure.
My overall verdict for the Canon 7D Mark2 is a definite yes for all kind of nature photographers. Canon has carefully dealt with the issues of Canon 7D and am sure photography would be great fun for young amateurs wishing to step in the field of wildlife photography armed with this new Canon machine.
Adobe Creative Cloud Offering

Not endorsing Adobe here but this was a really cool offer shared by their team and am pleased to share it across with all you shutterbugs.
The Adobe Photoshop Photography Program is now available to everyone for a limited time! Sign up before March 31, 2014 to receive Photoshop CC, Lightroom 5, 20GB of storage and Behance ProSite for just Rs. 499/- per month. – https://creative.adobe.com/plans/offer/photoshop+lightroom?sdid=KKLSg
For more details, Call: +91 8088928856 or email: adobe@beahead.biz
African ‘High’ Lights
The best part about photography in Masai Mara is the even light conditions. A slight cloud cover during the Great Wildebeest Migration months makes the light soft and apt for photography. Unlike Indian terrains, the Savannah lights are devoid of any obstructions and as a photographer you hardly miss any details while shooting in these conditions.
Post spending almost 12-13 hours on the field everyday, you hardly get 5-6 hours of light conducive for photography. The noons are normally spent with subjects lazing around in harsh sunlight and in anticipation of some action which may or may not happen on that particular evening. It was some of these noon hours during which I spent some time with some common subjects in Mara to create high-key images over a period of 2 weeks during the Wildebeest Migration of August-September 2013… Experimentation in photography is always great fun as it was in this case as well..
Here are some of the Highlights of Masai Mara from 2013 (click on the images to view the full screen on flickr):


Light & Source
Light is the key natural element that illuminates natural forms enabling us to see and absorb the wonders of God’s beautiful creations.
A tribute to God’s basic creation – LIGHT! Wishing you the best of light always and may all traces of darkness be accompanied with rays of light and hope.
The Ladakh Lab
As I was packing my bags for my 4th visit to Ladakh, Kahini (my wife) asked me “So what different are you going to shoot out there. I have seen those stereotype landscape shots from you many times!” I didn’t know what to reply and left it to fate.
While traversing through the star studded landscapes of Ladakh I thought of experimenting with HDR Panoramas, Long exposure panoramas and Long exposure HDRs. The results were super cool and I am pleased to share some of the results:
Canon 5DM3 – A welcome change

I have always been in my comfort zone when it comes to my equipments. For the past few years comfort zone for me signified bodies like the Canon 1DM4 and Canon 7D and along with my Canon 500mm f4 and other variable zoom telephotos like the Canon 70-200mm f2.8 and the Canon 24-70mm f2.8 etc. I was pretty vary of moving out of this comfort zone. Since wildlife is something I breath in and out on a daily basis this for me was by far the best combination and I was super happy with the combination… And then Canon launched the 5DM3. Despite the massive hysteria around this launch I was unperturbed and continued my daily field activities with this combo. My stereotype perceptions were that I needed range and cropped censors give me that. I need speed in the form of fps and my current set of bodies give me that.
However over the last one and a half years I had been closely analyzing the results of my Canon 7D and I was not particularly happy with the details and the image quality of the body. The low light performance was good but not great specially for me since I shoot more of big cats and their activity is on the higher side in early mornings and late evenings. Even in good light the results of my 7D were no where in comparison to the 1DM4 which Canon India had been regularly giving me for use from time to time.

So post multiple discussions with our friends at Canon, I finally decided to take the 5DM3 plunge. Fortunately a photographer friend of mine had already started using the 5DM3 and it was a good enough push for me. In May I went to Bandhavgarh for my first shoot armed with the new 5DM3. I was using my 1DM4 on the 500mm and the 70-200mm on the 5DM3. It was a critical project and I was being cautious with the combination as I didn’t want to risk using a new body I was not familiar with on a lens which would be majorly in use for this shoot.
A few shots with the 5DM3 in this 10 day shoot and the results were good but since I didn’t use it extensively I was not in a position to test it properly. Most of the images I created were in good light. One major change which I welcomed with open arms were the 61 AF points including the 41 cross type AF points for f4 lenses and the 5 dual diagonal AF points for the 2.8 lenses. With the AF points widely spread across the viewfinder framing and composition became very easy and this feature was fun to use (infact I found the spread better than the 1DM4)

Within the next 10 days I was ready for my second shoot with the 5DM3. The destinations were again 2 prime tiger parks – Tadoba and Bandhavgarh. This time I was more comfortable using the 5DM3 with the 500mm f4. It was 5:30pm in the evening in Bandhavgarh and 3 tiger cubs walked out against a lush green backdrop and played like maniacs in front of my lens. This was a true test for the 5DM3.
With the light fading every moment I started pushing the ISO up from 500 to 640 to 800 to 1000 to 1600 right up to 2000 (at 6:15pm). I had already done a bit of ISO testing for the 5DM3 in Tadoba prior to this because of which I was taking this calculated risk. The results were outstanding. Infact I don’t think I could have taken this tiger series without the 5DM3.

Home of the elephant by Shivang Mehta
Here is my take on the 6fps and where it is an apt speed for shooting wildlife. Having used bodies that shoot at 8fps and 10fps I thought deeper into this. If you are going for a typical 4-5 day shoot to any forest, how many times do you actually make use of the 10 or 8 fps on the field. During my flat 20 day trip to Bandhavgarh in March/April I was armed with 1DM4. I fired the 1DM4 at full burst hardly twice. The tiger cub sequence which I had taken with my 5DM3 was full of super fast actions as the subject were continuously air borne for 45 odd minutes. I have hardly missed out on any of the action because of the 6fps.
As a matter of fact during my recent trip to Bhadra Tiger Reserve I shot fast and swift river terns gliding over the water level and electric speed for taking a sip. The 5DM3 helped me capture this moment highly effectively. (View River Tern Hysteria for details) So essentially if I am using the right set of prime lenses (500 f4, 400 f2.8 or the 300 f2.8), the 5DM3 does make a lethal combo.
And for first time full frame migratory photographers like me, just get hold of a 16-35 f2.8 lens and explore landscape photography with this latest marvel from Canon!
Pench Perspectives
It was a dark and gloomy evening in the Mowgli land and with the onset of monsoons, the weather was looking great for a drive in the forest but unfortunately pleasant driving weather doesn’t go too well with photographers because of our over-dependency on light sources which keep our trigger fingers happy. To the naked eye (because of the absence of light) Pench which I feel is one of the most picturesque parks of Madhya Pradesh when it comes to landscapes was looking pale and colorless. So I decided to experiment with some monotone perspectives and fortunately the denizens obliged making a supposedly dry drive very productive and interesting. Here are few of the images created during the last 2 days in Pench:
Bandhavgarh @ 50mm
My 50mm hysteria continued after the first bit of experimentation in Corbett and this time the decisions were bolder for the subject and opportunities in question were rarer and the risk of missing out superb tight frames was higher. However trying this on the striped cats was great fun never-the-less. The reactions of the people around me was very amusing whenever I mounted this mini-glass on my camera. I remember that while I was creating a 50mm perspective of the devoted one eyed beauty Vijaya (Kankatti), someone in the crowd of tourist was murmuring in the background – “Seems he has forgotten to put his lens in excitement !”
Pleased to share some of the images created during my recent trip to Bandhavgarh National Park:

 takes shelter in the scorching Bandhavgarh heat")

Corbett @ 50mm
The eye is one of the best cameras nature has given to all living forms – specially humans. With tons of data storage space and the ability to create the impression of an image, the human brain has abilities which none of the Nikons and Canons of the world can re-create. It is normally said that a 50mm lens approximates the magnification of a human eye. A “normal” lens (~50mm on a 35mm film format camera) essentially produces an image that, when viewed on a print at a normal distance for the size of the print, looks something like what you would see when viewing the scene.
So after shooting in Corbett for many years, I decided to view the Himalayan wilderness from a 50mm perspective. While I was driving to Corbett, I was trying hard to visualise perspectives that would look appealing from this point of view but eventually I left it to mother nature to bless me with the vision to look Corbett from this angle. It was hard to resist the 500 prime and the super effective combinations of the other variable zoom lenes which were ready with me during my forest drives. The results however were satisfactory to some extent and forced me to see, observe and shoot frames that I would normally ignore.
Am pleased to showcase some of the images…

Crested Serpent Eagle

Green Gold in early morning light at Corbett

Young langur monkeys & their acrobats

The lifeline of Corbett

Lights & Grassland

Riverbed in Monochrome
The Cicada Rain

Shooting with remote triggers or in-camera timers at low shutter speeds in order to avoid camera shake can definitely be tried on subjects other than landscapes (where you intend to take those long exposure shots of streams or a night sky). Here is an example.
Sharing the smallest subject I shot in Bandhavgarh during a visit last year (and one of the most interesting moments)…
What’s the Cicada Spray all about
Do you always wonder from where do tiny droplets of water fall on your body when you are patiently waiting for a bird shot or a tiger in the forest. You look at the the cloudless sky to check if its drizzling. Here is the reason…
Cicadas are the culprits. Clinging on tree tops, Cicadas apart from making the loud buzzing sounds drink tree sap. Tree sap is the principal food of cicadas. they take the necessary nourishment and water from the sap, with waste matter and fluid accumulating in a rectal pouch. If it is necessary, the waste can be released and disposed of all at once through the anus.
Story behind the picture
Here is a Cicada caught spraying in Bandhavgarh. It took quite some effort to shoot this one as this guy was at some distance and even the biggest lens were not effective enough to get the effect. The subject was near but too far and small for the long telephoto. It was far for a macro lens as well. Experimenting with various combination of equipments, I finally decided to use the cropped sensor of a Canon 7D and mounted a Canon 100-400mm lens along with a 2x converter to shoot this one. The frame was perfect but at 400 ISO the shutter dropped to 1/20 which was not good enough.
Using a remote trigger we tried to time the shot with the timing of the spray but the 10-15 odd attempts were unsuccessful. Finally, we decided to use the interval-meter and let the camera take a shot every second for a minute or so. This was the one spray shot that we got right in the series.
Elephant Photography in Corbett

Elephant herd in Corbett
Mesmerizing stretches of grasslands that extend till the horizon, lush green and dense saal covers that tell a compelling natural tale and a sparkling river that garlands this entire forest belt, the mysteries of Corbett National Park are never-ending. Though I consider the striped cat as the ghost of Corbett, one subject that actually spices up the mysticism of Corbett is the Asiatic Elephant.
A unique combination of majestic yet raw power, family bonding, animal emotions – these unsung rulers of Corbett are extraordinary subjects to shoot in the wild. A decent elephant herd in Corbett can keep you engaged for hours as this is one subject that allows your to experiment and innovate continuously. Having shot elephants in this stunning landscape over the last few years, this note talks about different aspects of shooting the gentle giants of Corbett.
The typical good elephant sighting (from a photography perspective) can be broadly classified into 2 categories. If we take the Dhikala zone as an example, you may encounter bull tuskers or a family herd on the 30 odd kms main road stretch that opens up in the Dhikala grasslands. Such stretches can also be seen in the saal forest belt of Kamarpatta which is again a good stretch for elephant. Sightings on these patches automatically lead to some outstanding frames for the saal cover give a natural frame which looks great vertically as well as horizontally. The challenge however is the light.

Elephant walking in a saal forest in Corbett
According to me, one of the key elements of shooting elephants in the wild is maintaining distance. Though elephants at time allow you to come closer but the risk and danger of a mock charge has an impact on the shoot. Close range shooting is definitely an adrenal rush for photographers but it acts as a big hindrance as well. The slightest movement in the vehicle (if you wish to change bodies or angles) may provoke the elephants and the following mock charge will invariably result in shaky pictures specially in the patches of road mentioned above.
Using a combination of long and medium tele-photo lenses you can create amazing elephant perspectives from a distance. In case of an elephant sighting with the saal backdrop I normally maintain a distance of 30-50 meters from the subject. My most preferred lens in the 70-200mm f2.8 for it can account for the lack of light and still maintain the sharpness. However I have used the 100-400mm in the past and with proper bean bag support you can create superb pictures as well. Your ISO in this case would depend on the time of the day but typically you should be hovering in the range of 400 to 640. Another important factor is the angle from which you are shooting. If your vehicle is facing the elephant, you would probably have to rest your beanbag on the gypsy rod which elevates the angle. I would however prefer the gypsy to be turned the other way round so that I can shoot using the backseat support which is a lower angle.
If you are carrying multiple bodies, I would also recommend to keeping a wide angle ready from the elephant(s) would cover the distance in no time and before your driver moves further away you can quickly target frames as soon as the subject is within the 15 odd meter distance.
Regular Corbett visitors would know that elephant herd crossings on the saal patched main road just before the Dhikala FRH are frequent. Typically in the morning the light is very low in this patch. But the beautiful forest backdrop is inducing enough to try some shots. A few experiments with slow shutter on this patch can create some very interesting perspectives.
Moving to the other broad category of elephant sightings in Corbett. It’s a known fact that the Dhikala chaur is the best area to shoot elephants in India specially during the months of March to June. The short green grass, plenty of ambient light, soothing neat backdrops make it a hot-spot for photographers. Some of the best action shots of elephants have been created in these grasslands.

Again I prefer maintaining distance and using a combination of lenses because of the reasons already mentioned. Typically a long telephoto like a 500 or 600mm gives you nice images with wonderful backgrounds. Medium telephotos can be used when the herd is crossing the road to reach a different patch of the grassland. Talking of the grasslands, I have observed that the light is conducive in the morning in the mota saal area and the rest of the areas of the chaur like the Kaal road and the areas near the reservoir are well lit in the evening.
With change in angles you can also experiment with back-lights in the grasslands. In fact, if you are passing by the High Bank area in the evening, it would be a good idea to check the presence of elephants in the evenings for this area for me is a great location for silhouettes as well.

I believe that elephant photography in Corbett can be very engaging but requires focused attention. If one wants to specifically go for dedicated elephant stock, probably you should park the big cat thought for those days. Though there are sizable herds of elephants and their sighting may not be cause of concern. However photographing elephants like any form of wildlife photography is again a game of patience and luck as you need to find them in the apt vegetation and light conditions to work on and create innovative images. Who knows that with your mind engulfed with elephant frames, you may have that unexpected cat encounter as well!